Crafting a LinkedIn follow-up system is key to keeping conversations alive and turning connections into opportunities. Without a structured plan, messages often get lost, and potential deals slip away. Here’s the core idea:
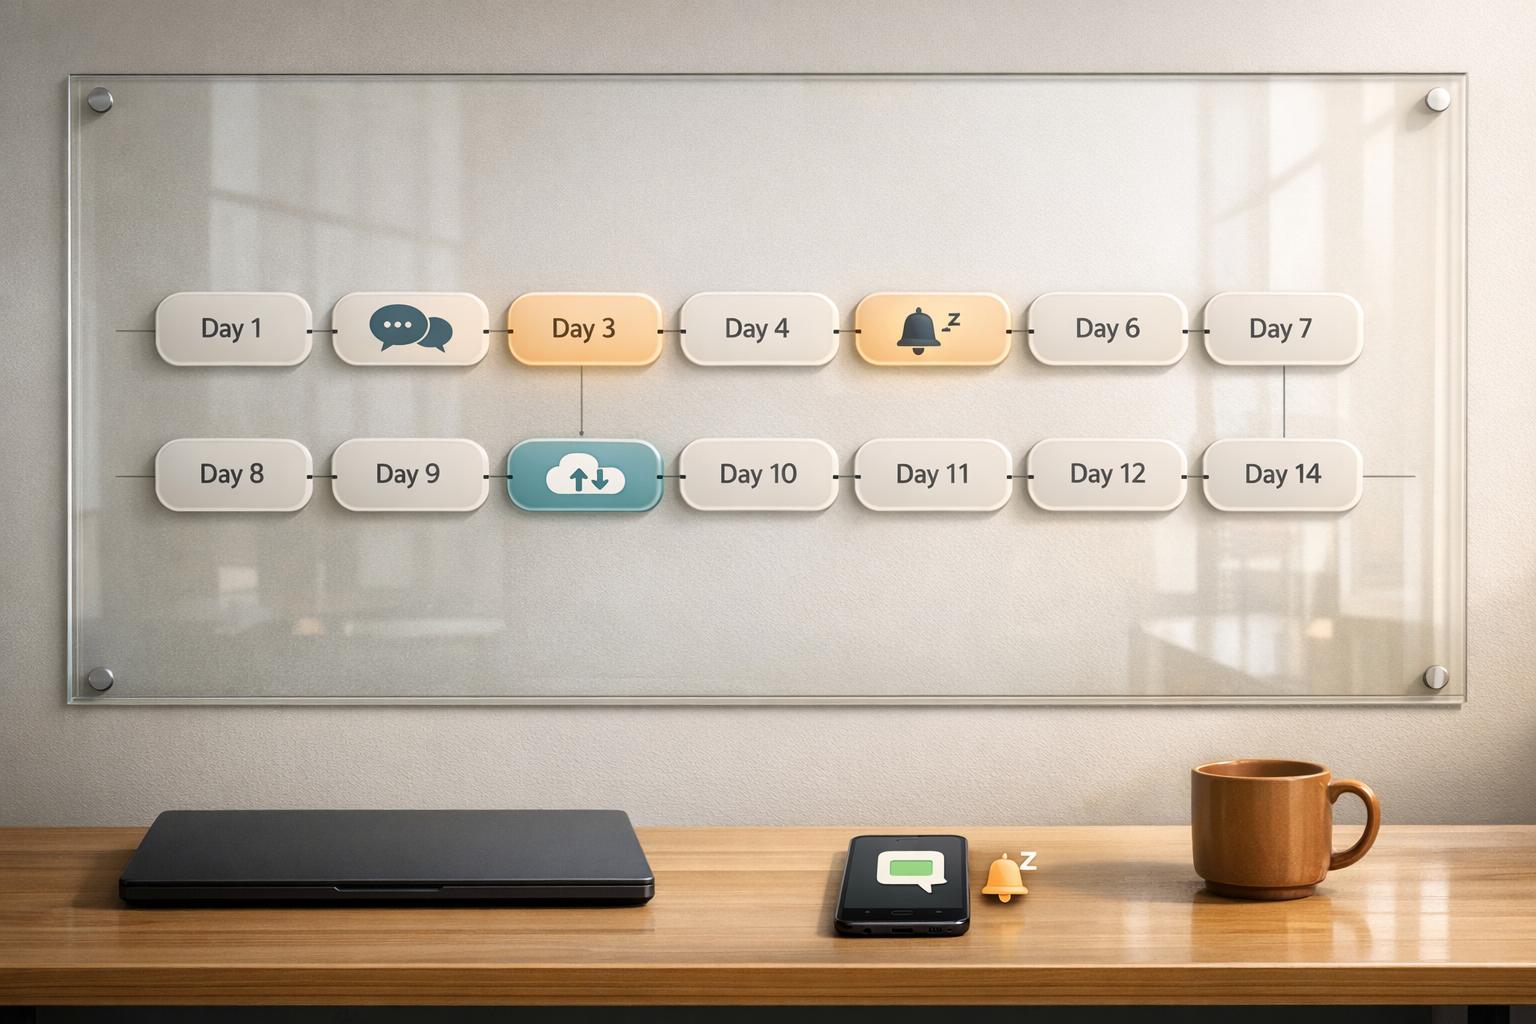
- Follow-Up Timing: Use a 14-day schedule with follow-ups on Days 1, 4, 9, and 14. Space messages 3–5 business days apart to remain professional and consistent.
- Message Strategy: Avoid generic phrases like "just checking in." Instead, offer value by sharing articles, insights, or resources tailored to the recipient.
- Tools for Organization: Use split inboxes, labels, and snooze reminders to manage threads effectively. Keep conversations organized and prioritize leads.
- Automation and Personalization: Combine saved snippets for efficiency with personal touches like voice notes to maintain a human connection.
- CRM Integration: Sync your LinkedIn activity with tools like HubSpot or Google Sheets to track progress and save time on manual updates.
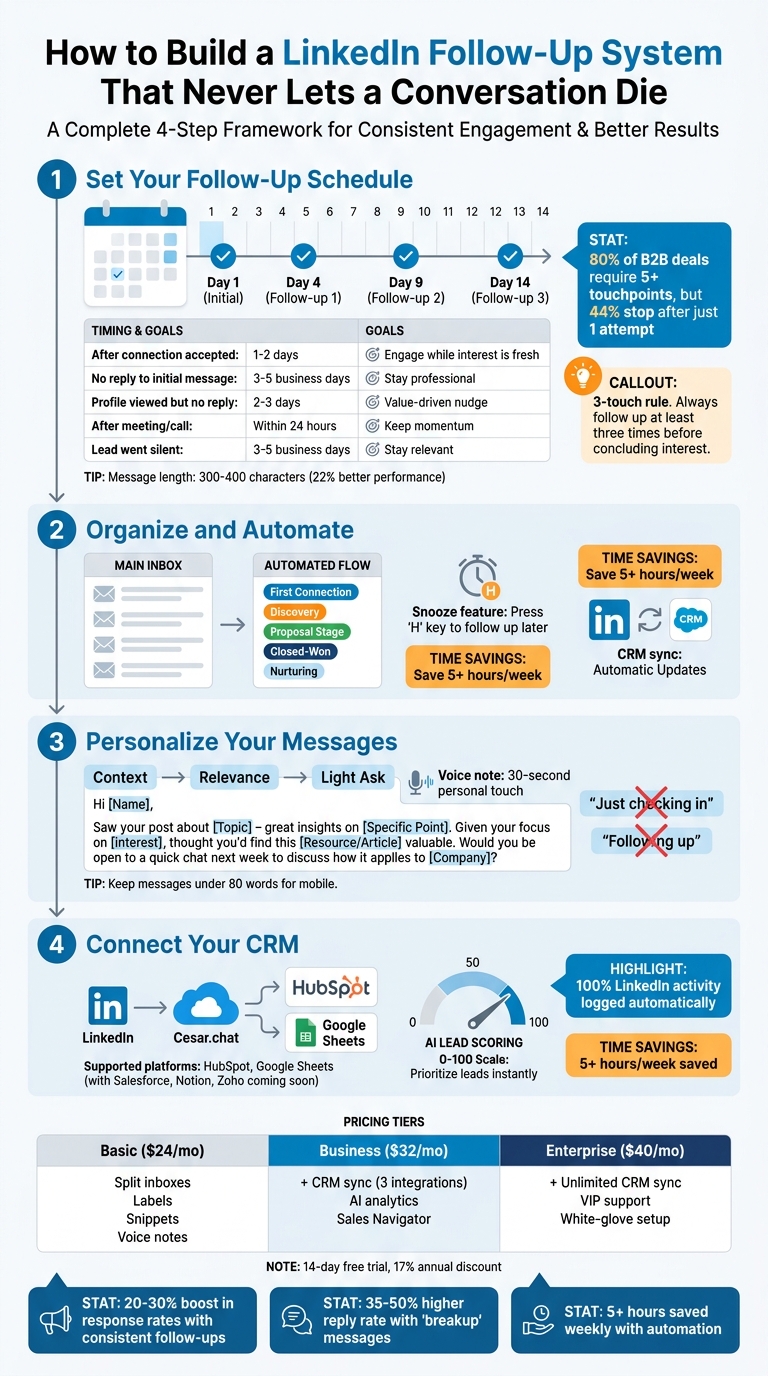
LinkedIn Follow-Up System: 4-Step Framework with Timeline and Tools
Step 1: Set Your Follow-Up Schedule
Timing is everything when it comes to turning a conversation into a meaningful connection. A well-planned schedule ensures you’re neither too aggressive nor too passive, striking the perfect balance.
Creating Your Follow-Up Timeline
A 14-day plan works well, with follow-ups on Days 1, 4, 9, and 14. After your connection request is accepted, wait 12–24 hours before sending your first message. This avoids LinkedIn’s automated filters. If there’s no response, space your follow-ups 3–5 business days apart.
Here’s a quick breakdown of timing for different situations:
| Scenario | Ideal Wait Time | Goal |
|---|---|---|
| After connection accepted | 1–2 days | Engage while interest is fresh |
| No reply to initial message | 3–5 business days | Stay professional and respectful |
| Profile viewed but no reply | 2–3 days | Offer a gentle, value-driven nudge |
| After meeting or call | Within 24 hours | Keep the momentum going |
| Lead went silent after replying | 3–5 business days | Allow breathing room, stay relevant |
This schedule helps you stay top-of-mind without crossing the line into being overbearing. The 3-touch rule is a smart approach – after three follow-ups spaced out appropriately, it’s time to either move on or try a different channel, like email. Keep in mind that while 80% of B2B deals require five or more touchpoints, 44% of professionals stop after just one attempt.
Now, let’s dive into how to craft follow-ups that bring value without overwhelming your prospect.
How to Be Persistent Without Being Pushy
Timing isn’t the only factor – what you say matters just as much. Each follow-up should offer something new. Avoid the tired “just checking in” or “following up” messages. Instead, share something meaningful: a relevant article, a case study, an observation about their company, or a resource they might find helpful.
"You don’t need to send 7 follow-ups to get results. The best reply rates come from a well-timed second or third follow-up, not just hammering the same CTA."
- Laura Hannah, Founder, Pitch121
Keep your messages concise – 300–400 characters is ideal, as shorter messages tend to perform 22% better. When suggesting a meeting, make it easy for them to decide by offering a binary choice, like: “Would a 10-minute call help, or should I send a case study first?” This reduces the mental effort required to respond.
If you hit Day 14 without a reply, send a polite “breakup” message that leaves the door open. For example: “I’ll assume the timing isn’t right – feel free to reach out when it makes sense.” Surprisingly, this type of message often prompts a response, with a 35–50% higher reply rate as it removes the pressure.
sbb-itb-3e8f5dc
Step 2: Organize and Automate Your Messages
Once your follow-up schedule is set, the next hurdle is managing all those conversations. With potentially hundreds of LinkedIn threads to track, a messy inbox can quickly derail your efforts. The solution? Smart tools for organization and automation that take care of the heavy lifting. This step connects your follow-up plan with efficient tracking methods.
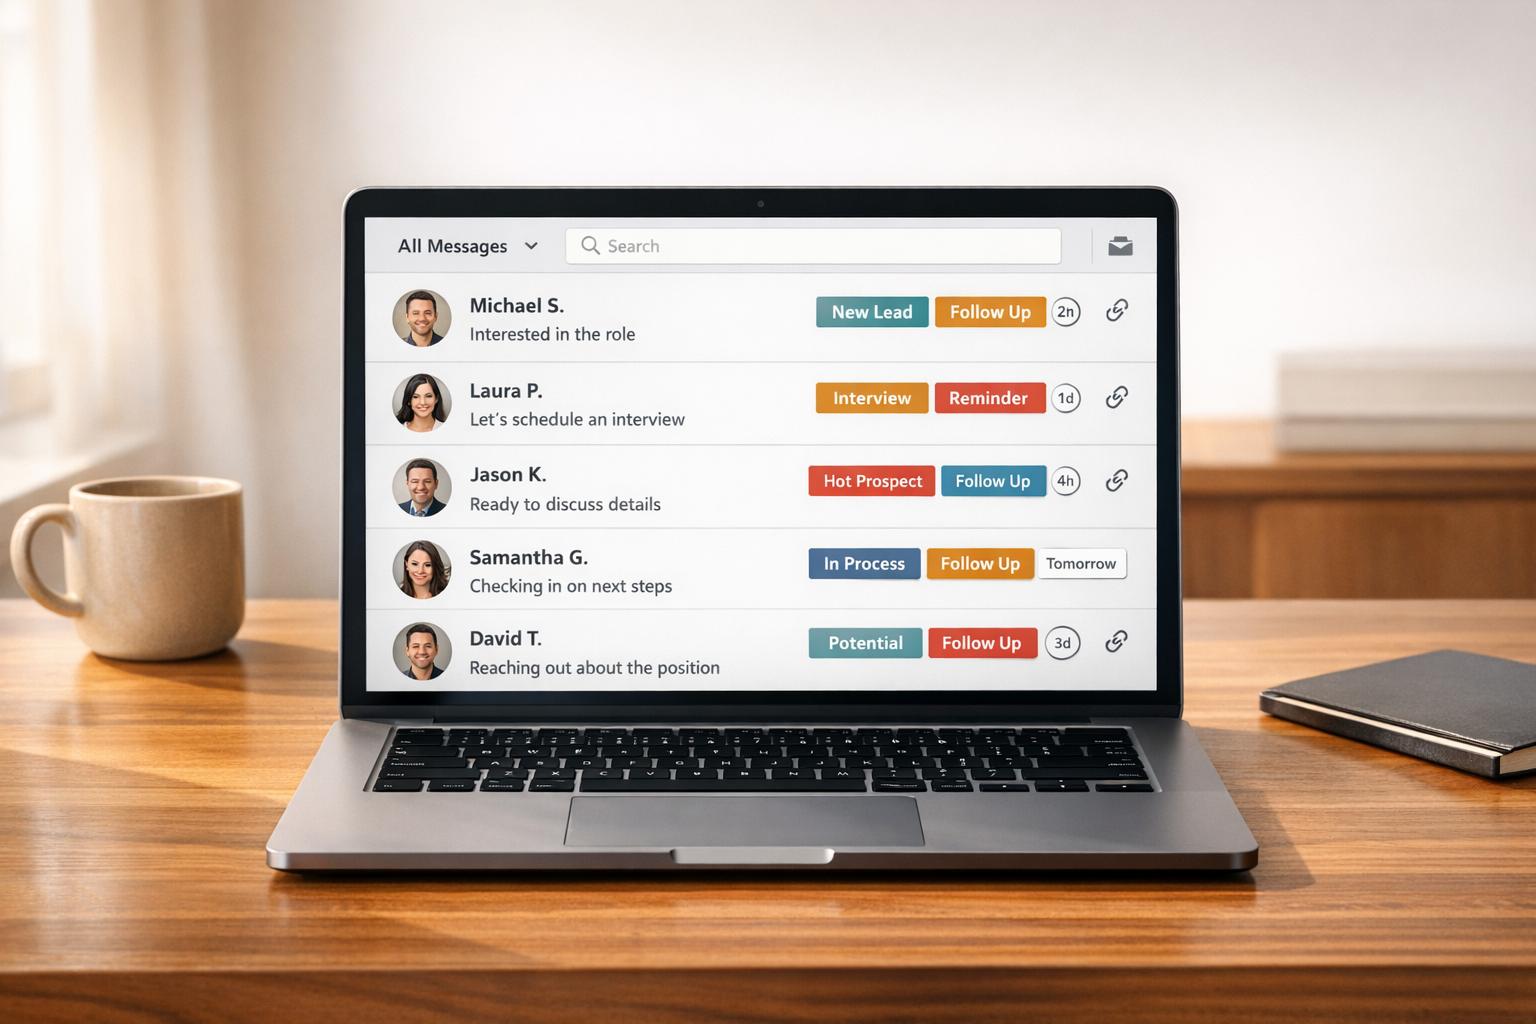
How to Use Split Inboxes and Labels in Cesar.chat
Split inboxes can automatically sort your messages, making it easier to focus on what matters most. For instance, you can route messages from decision-makers at target companies to a "Hot Leads" inbox while keeping casual networking threads in a separate view. This way, you never lose track of high-priority conversations.
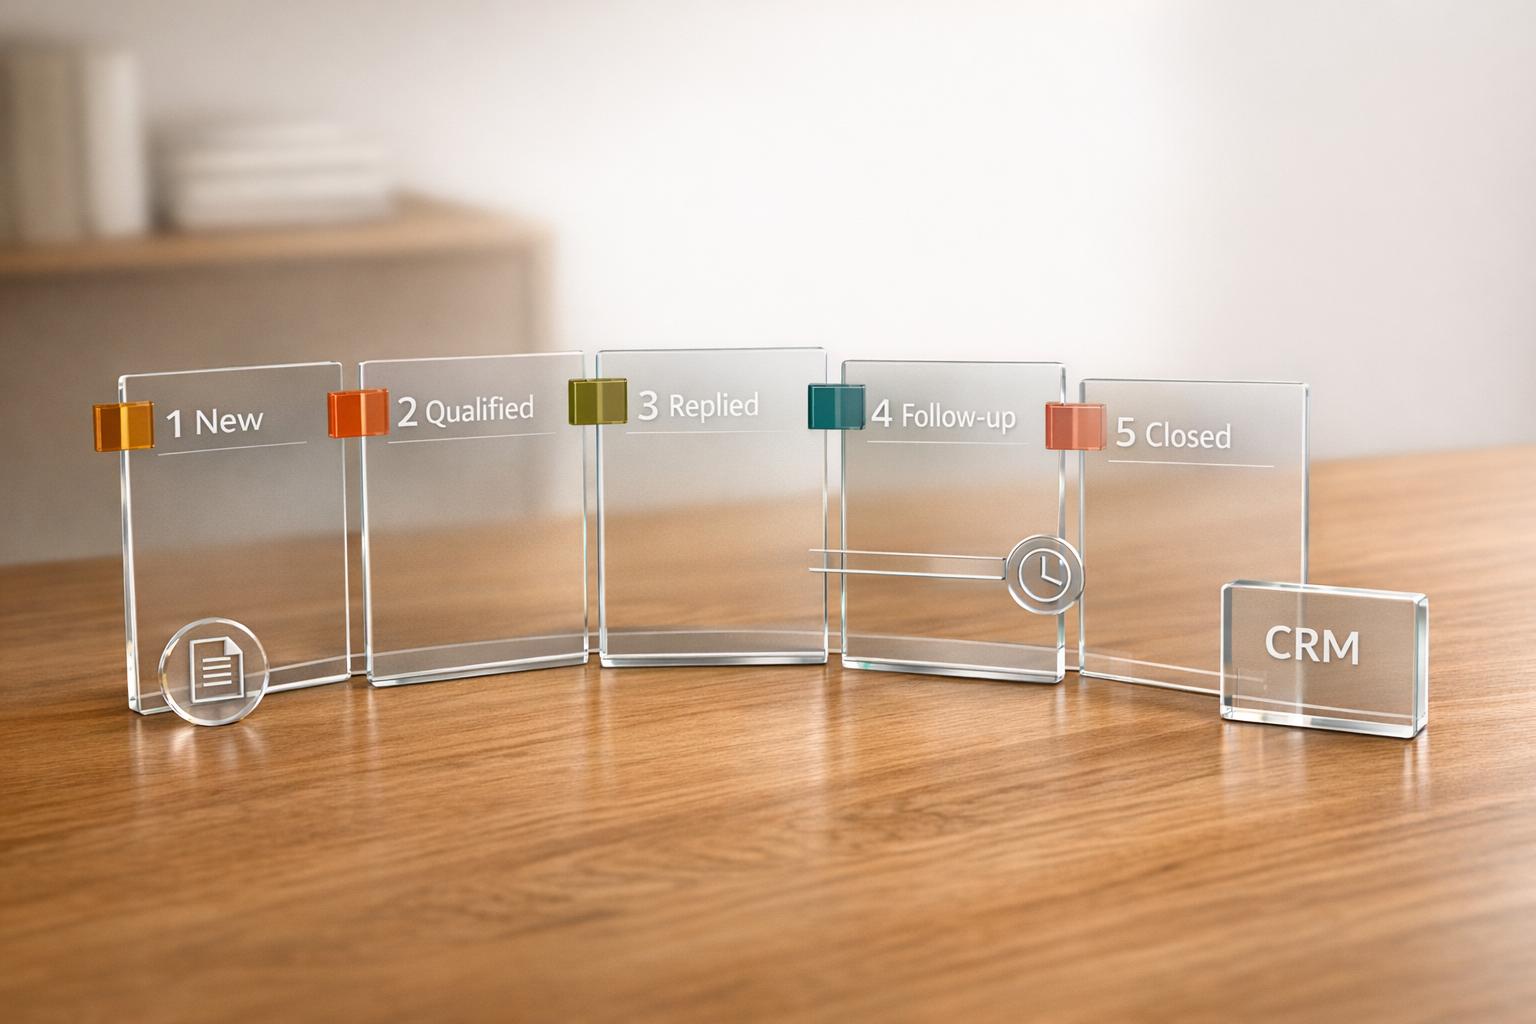
Custom labels are another powerful tool. Use labels like "Proposal Sent", "Awaiting Response", or "Nurture" to tag your threads. These labels sync directly with your CRM, meaning when you mark someone as a "Qualified Lead" in Cesar.chat, that status is updated in tools like HubSpot or Google Sheets – no manual data entry required. This system can save sales teams over 5 hours each week by eliminating the need to dig through old threads or copy-paste conversation details.
To avoid overcomplicating things, keep your label system simple. Stick to 5–8 key categories that align with your sales stages. Too many labels can lead to decision fatigue and slow you down. A streamlined system might include categories like "First Connection", "Discovery", "Proposal Stage", "Closed-Won", and "Nurturing." Once your labels are in place, the next step is setting reminders to ensure no conversation gets overlooked.
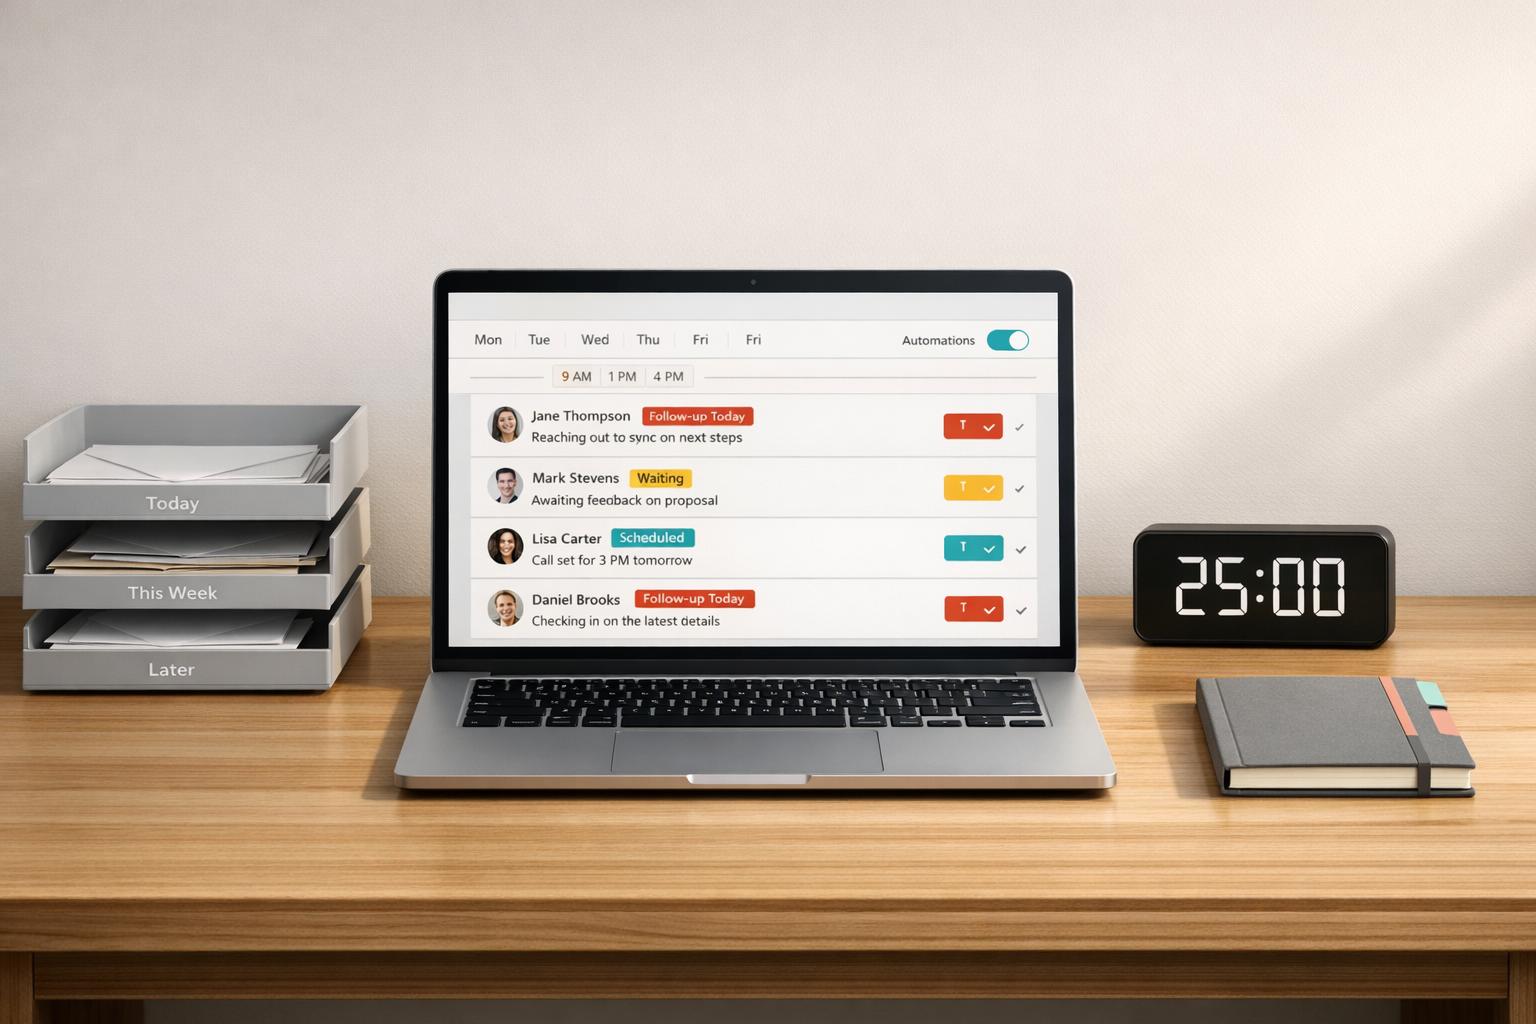
Setting Reminders with Snooze Threads
The snooze feature is a game-changer for managing follow-ups. It temporarily removes a conversation from your inbox and brings it back when you need to act, eliminating the risk of forgetting important threads.
Here’s how it works: press the ‘H’ key on any thread, select when you want it to reappear – whether in 3 days, a week, or on a specific date – and the thread vanishes from view until then. When it resurfaces, it appears at the top of your inbox with any applied labels, so you can immediately see its priority.
For example, say you send a proposal on Monday and plan to follow up on Thursday morning. Simply snooze the thread for 3 days, and at 9:00 AM on Thursday, it’ll reappear with the "Proposal Sent" label, ready for your next message. This keeps your inbox focused on what needs attention now, while ensuring nothing slips through the cracks.
Step 3: Personalize Your Follow-Up Messages
Automation can simplify your workflow, but it’s important to avoid sending messages that feel robotic. The trick is finding the balance – using tools to save time while still keeping your communication personal. That’s where features like snippets and voice notes come in. These tools combine the efficiency of templates with the flexibility to tailor each message.
Using Saved Snippets for Faster Responses
Saved snippets are pre-written templates that you can quickly insert into your messages. Instead of typing out the same introduction or pitch every time, you can use snippets with placeholders to personalize your outreach.
A great way to structure your snippets is with the "Context → Relevance → Light Ask" framework. For example, instead of the generic "Just checking in", you could use something like:
"Saw your team just hired a new VP of Sales – congrats! We’ve helped similar teams streamline their onboarding process. Does that sound worthwhile?"
This approach gives your message context, shows why it matters to them, and ends with an easy-to-answer question.
"Most follow-ups fail because they’re about you, not them. ‘Just checking in.’ ‘Bumping this up in your inbox.’ These phrases all translate to the same thing: ‘I want something from you and you’re ignoring me.’"
– Kolin Simon, Sales & Marketing Expert
Keep your snippets short – ideally under 80 words – so they’re easy to read on mobile devices. Use placeholders for specific details, like a recent achievement or a shared connection, to make each message feel unique. Tools like Cesar.chat offer unlimited snippets starting at $24/month, allowing you to create templates for every type of follow-up, whether it’s an initial outreach, a value-driven follow-up, or a gentle nudge. Plus, these templates help you stay efficient without running into account restrictions.
For those moments when you want to go beyond text, consider adding voice notes to your follow-ups.
Adding Voice Notes for a Personal Touch
While snippets save time, voice notes can make your outreach feel more human. They’re especially useful for building rapport or explaining complex ideas. For example, after sending a proposal using a snippet, you could follow up with a quick 30-second voice note summarizing the benefits and adding a personal touch.
Cesar.chat’s voice note feature (included in the Basic plan for $24/month) integrates seamlessly into your workflow, making it easy to record and send notes. Combining voice notes with snippets creates a system that’s both efficient and personal – giving you the best of both worlds.
Step 4: Connect Your CRM for Better Tracking
Once you’ve set your schedule and customized your messages, it’s time to integrate your CRM. This ensures that no detail gets overlooked. With Cesar.chat, your LinkedIn messages, notes, and labels are automatically pushed into your CRM, keeping your contact timeline up-to-date. Sales teams can save over 5 hours a week by cutting out manual data entry.
The standout benefit? 100% of your LinkedIn activity is logged in one place. Whether you’re nurturing a lead or reconnecting with a client, every interaction is recorded. If a contact isn’t already in your CRM, the system automatically creates a new record. This way, you won’t find yourself scrambling to update your database after a productive chat.
This integration simplifies follow-ups and ensures real-time tracking of your progress.
How to Set Up Live Sync with Your CRM in Cesar.chat
Getting started with this integration is quick and easy. Open the Cesar.chat desktop app, head to the Integrations section, and choose your CRM. Currently, HubSpot and Google Sheets are supported, with Salesforce, Notion, and Zoho CRM coming soon. Once you connect your account, you can select between "sync on demand" (manual sync for specific threads) or "automatic streaming" (real-time sync). After setup, your LinkedIn DMs will be automatically logged on the corresponding contact’s timeline in your CRM.
Custom labels like "Hot Lead" or "Client" sync directly with CRM properties, allowing you to create filtered reports and track conversions. Even Sales Navigator messages are synced, giving you a complete view of your LinkedIn interactions. This feature is available with the Business plan, priced at $32/month, which includes up to three integrations and access to AI analytics.
Using Analytics to Improve Your Response Rates
Integrating your CRM isn’t just about staying organized – it’s about refining your approach. Cesar.chat’s AI analytics evaluate each lead on a 0–100 scale, based on how closely they align with your ideal customer profile. This scoring system helps you decide where to focus your energy. On top of that, the platform offers actionable tips to fine-tune your outreach.
Dive into the data to uncover trends. Check the synced conversation timelines to identify which messaging strategies are most effective, or generate reports to compare response rates by lead category. If the data shows that some labels convert better than others, you can tweak your strategy for better results. For those looking for advanced features, the Enterprise plan at $40/month includes unlimited sync options and a white-glove setup service.
Cesar.chat Plans for Follow-Up Systems
When deciding on the right plan, consider how many conversations you’re handling and whether CRM integration is a must-have for your workflow. Every plan includes essential follow-up tools like split inboxes, labels, reminders, and saved snippets, ensuring even the entry-level option equips you to manage your LinkedIn messages effectively. Let’s break down the Cesar.chat plans to see which one fits your needs.
The Basic plan is priced at $24/month and works well for solo professionals managing fewer than 50 active conversations. It includes unlimited labels, saved snippets, and voice notes, providing all the essentials for maintaining a personal touch. It’s a great starting point for those new to follow-up systems.
The Business plan costs $32/month and builds on the Basic plan by adding CRM live sync (up to three integrations) and AI analytics, which scores leads on a 0–100 scale. This plan suits professionals with moderate outreach needs who want to track performance. It also includes Sales Navigator messages, helping you connect with more prospects.
For teams or users handling a high volume of conversations, the Enterprise plan at $40/month is the most robust option. It offers unlimited CRM sync destinations, VIP support, and white-glove integration services. The advanced analytics dashboard enables you to monitor response rates across your team, ensuring no conversation slips through the cracks.
Plan Comparison Table
| Feature | Basic ($24/mo) | Business ($32/mo) | Enterprise ($40/mo) |
|---|---|---|---|
| Split Inboxes & Labels | ✓ | ✓ | ✓ |
| Snooze Threads (Reminders) | ✓ | ✓ | ✓ |
| Saved Snippets | Unlimited | Unlimited | Unlimited |
| Voice Notes | ✓ | ✓ | ✓ |
| CRM Live Sync | ✗ | Up to 3 integrations | Unlimited sync destinations |
| AI Lead Scoring & Analytics | ✗ | ✓ | ✓ (Advanced) |
| Sales Navigator Messages | ✗ | ✓ | ✓ |
| VIP Support | ✗ | ✗ | ✓ |
| White Glove Setup | ✗ | ✗ | ✓ |
Each plan includes a 14-day free trial and offers a 17% discount for annual billing. With these options, you can choose the plan that best supports your goals and ensures every conversation is handled seamlessly.
Conclusion
Key Takeaways
Creating a LinkedIn follow-up system doesn’t have to be overwhelming. What it really boils down to is consistency, organization, and using the right tools. Start by setting a clear timeline for follow-ups – whether it’s three days, one week, or a month – so you can stay persistent without coming across as pushy. Tools like split inboxes and labels in Cesar.chat can help you prioritize conversations, while snooze reminders ensure no important thread gets forgotten. Personalization is key to making your messages stand out, so make use of saved snippets for efficiency and voice notes to add a personal touch. And don’t forget to connect your CRM to track response rates and fine-tune your strategy based on actual data.
Consistent follow-ups can transform missed opportunities into meaningful outcomes. Professionals who follow up regularly often see a 20–30% boost in response rates – but only when they keep their outreach personal. Cesar.chat simplifies this process, cutting manual work in half while offering analytics to show what’s working. Whether you’re juggling 10 conversations or 100, this system grows with you.
Next Steps
Now it’s time to take action. Sign up for Cesar.chat today and start building your follow-up system. Import your LinkedIn conversations, organize them with labels, and try out the snooze feature. Create 3–5 saved snippets for your most common follow-up messages, and if you’re ready for more, connect your CRM to sync conversations automatically. Test the system with 10 contacts this week, send your first follow-up messages, and track the results. With these strategies, you’ll be turning conversations into opportunities in no time.
FAQs
What should I do after Day 14 if there’s still no reply?
If there’s no response after Day 14, send a follow-up within 3–5 days if they’ve viewed your profile but haven’t replied. If they’ve accepted your connection, follow up within 1–2 days. Keep your follow-ups concise and respectful, limiting them to 2–3 messages. Adjust your timing based on the situation to stay professional and avoid overwhelming the recipient.
How can I automate follow-ups without sounding robotic?
To make LinkedIn follow-ups feel natural and not overly automated, consider using AI-powered tools that focus on personalization. These tools can analyze the recipient’s last reply and interaction patterns to create messages that feel relevant and conversational.
You can also use behavioral triggers – like when someone views your profile or engages with your content – to send messages at the right moment. Instead of relying on generic templates, tailor your follow-ups to reflect each prospect’s specific situation. This approach helps your messages come across as thoughtful and professional.
Which Cesar.chat plan do I need for CRM sync?
To use CRM sync, you’ll need the Enterprise Plan, which costs $40 per month. This plan offers unlimited sync destinations and access to VIP support to ensure everything runs smoothly.