Managing a high-volume LinkedIn inbox as a recruiter can quickly become overwhelming without a clear system. Here’s what you need to know:
- Key Challenges: Missed follow-ups, disorganized conversations, and limited InMail credits can lead to lost opportunities.
- Response Timing: 90% of LinkedIn InMail replies happen within the first week, so timely follow-ups are critical.
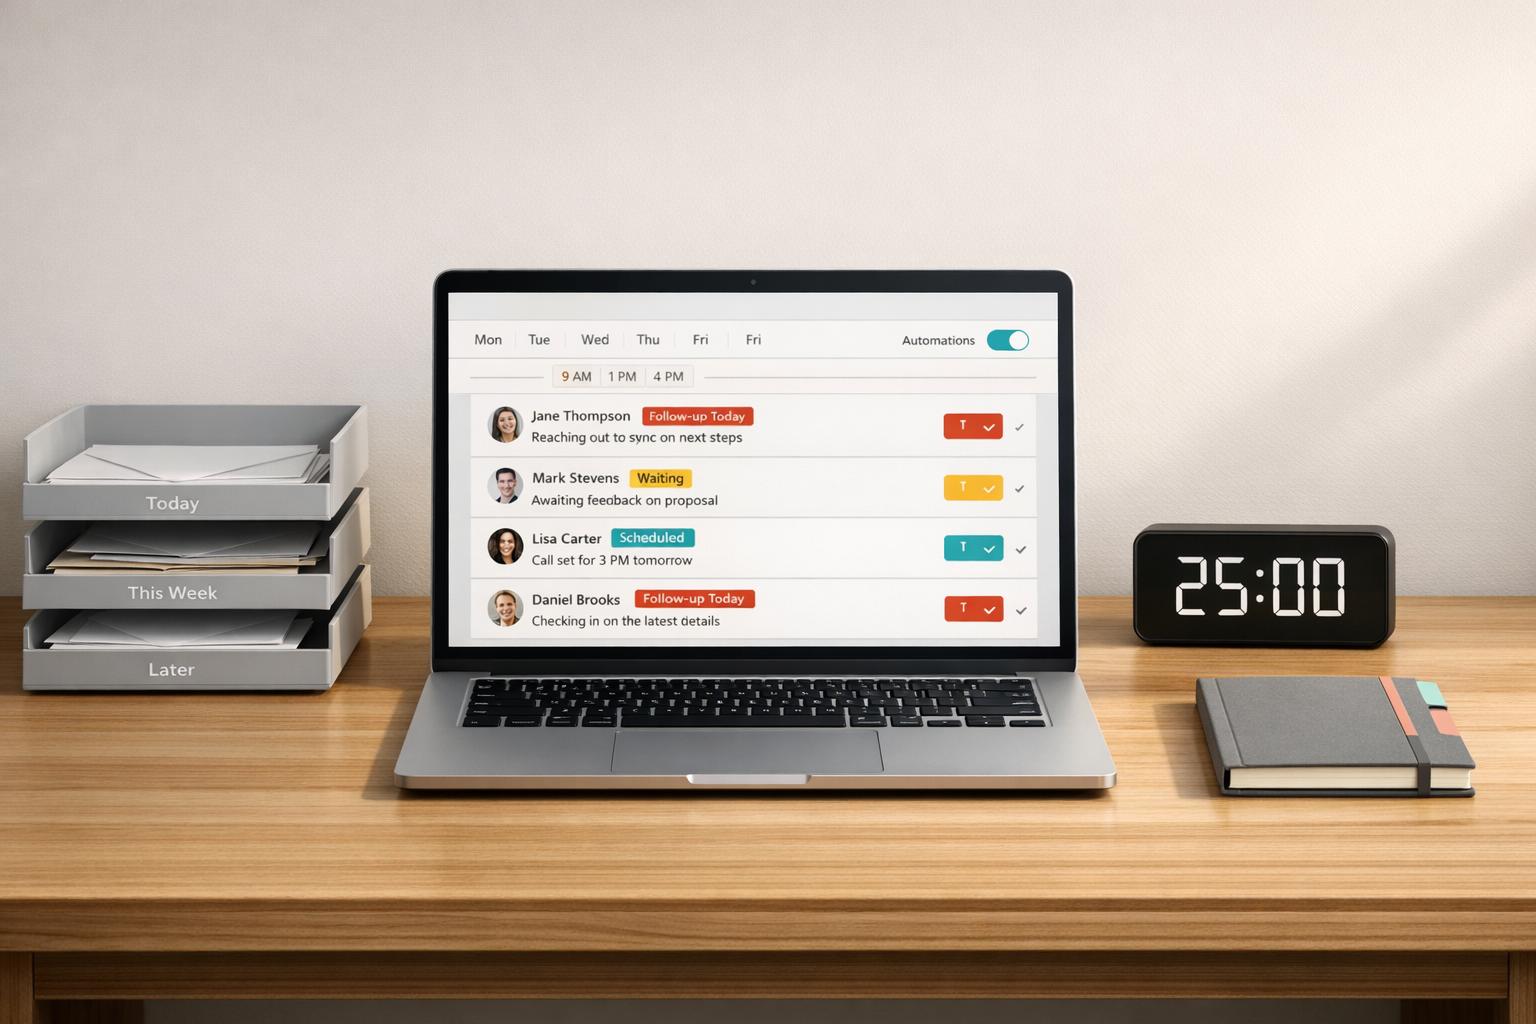
- Inbox Organization: Tools like Cesar.chat help you structure your inbox with labels, snooze features, and CRM sync to stay organized.
- Daily Workflow: Break your day into time blocks for outreach, follow-ups, and prioritizing replies.
- Message Limits: Stay under LinkedIn’s caps to avoid account restrictions. Aim for a 15–25% response rate before scaling outreach.
- Automation: Use snippets for faster messaging and tools like Cesar.chat for follow-up reminders and syncing with CRMs like HubSpot.
Bottom Line: A structured workflow combined with automation can help recruiters efficiently handle hundreds of messages daily while maintaining a professional and organized process.
Setting Volume Targets and Workflow Basics
LinkedIn Messaging Limits & Caps by Account Type
What Counts as High-Volume Messaging
High-volume recruiting on LinkedIn isn’t just about sending a ton of messages – it’s when your inbox starts to feel unmanageable. For most recruiters, that tipping point hits at 200+ messages per day, where keeping up with conversations becomes nearly impossible.
At this level, candidates often decide whether to respond in just seconds. Research highlights that 91.5% of cold outreach messages go ignored, making it clear that both the quality and timing of your outreach are just as important as the number of messages you send. Without a strategy, high-volume outreach can easily turn into noise.
Once you understand what qualifies as high-volume, the next step is knowing your platform’s limits.
Setting Limits for Effective Messaging
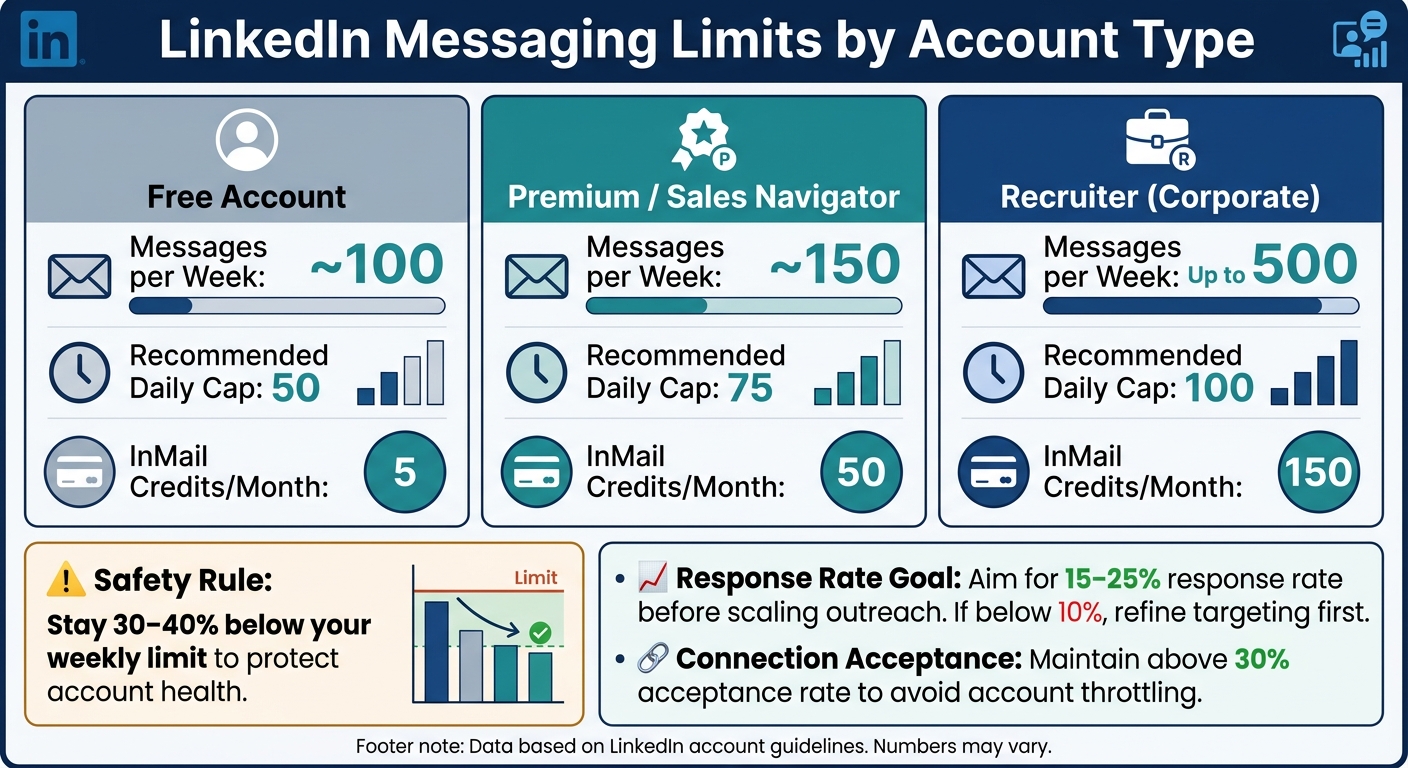
Stick to LinkedIn’s messaging limits to avoid account issues. Weekly caps vary depending on your account type, and exceeding these can lead to warnings or restrictions.
| Account Type | Messages per Week | Recommended Daily Cap | InMail Credits/Month |
|---|---|---|---|
| Free Account | ~100 | 50 | 5 |
| Premium / Sales Navigator | ~150 | 75 | 50 |
| Recruiter (Corporate) | Up to 500 | 100 | 150 |
To keep your account safe, aim to stay 30–40% below these limits. Also, pay attention to your response rate – if it’s below 10%, it’s a sign you need to refine your targeting or messaging before scaling up. Ideally, aim for a 15–25% response rate before increasing your outreach volume.
Connection request acceptance rates are another key metric. LinkedIn tracks these, and falling below a 30% acceptance rate could result in account throttling or warnings.
Once you’ve set these limits, structuring your daily workflow around them can make your outreach more efficient.
A Daily Time-Boxed Workflow
Organizing your messaging into time blocks can help you avoid burnout and improve results. Here’s a straightforward approach:
- Morning (30 minutes): Send out your daily batch of outreach – 20–50 connection requests or messages, depending on your account type.
- Midday (15 minutes): Review replies, prioritize hot leads, and mark threads that need follow-up later.
- End of day (15 minutes): Wrap up follow-ups and update your pipeline.
Timing matters, too. Messages sent between Tuesday and Thursday tend to perform better, with an 8% higher response rate compared to weekends. Saturdays, in particular, see 8% fewer responses than the weekly average. However, if you’re targeting highly sought-after candidates in competitive fields, Sunday might be worth experimenting with – only 2% of InMails are sent on Sundays, meaning less competition for attention.
"Three in four hiring professionals (74%) hope that generative AI can automate repetitive tasks to prioritize more strategic work." – Kelly Song, Product Marketing at LinkedIn
Maintaining a consistent daily rhythm – rather than cramming 200 messages into a single day – can also help protect your account health. Spacing out your activity mimics natural user behavior, which LinkedIn’s algorithms favor.
sbb-itb-3e8f5dc
How to Structure Your LinkedIn Inbox for Efficiency
What LinkedIn’s Native Inbox Gets Wrong
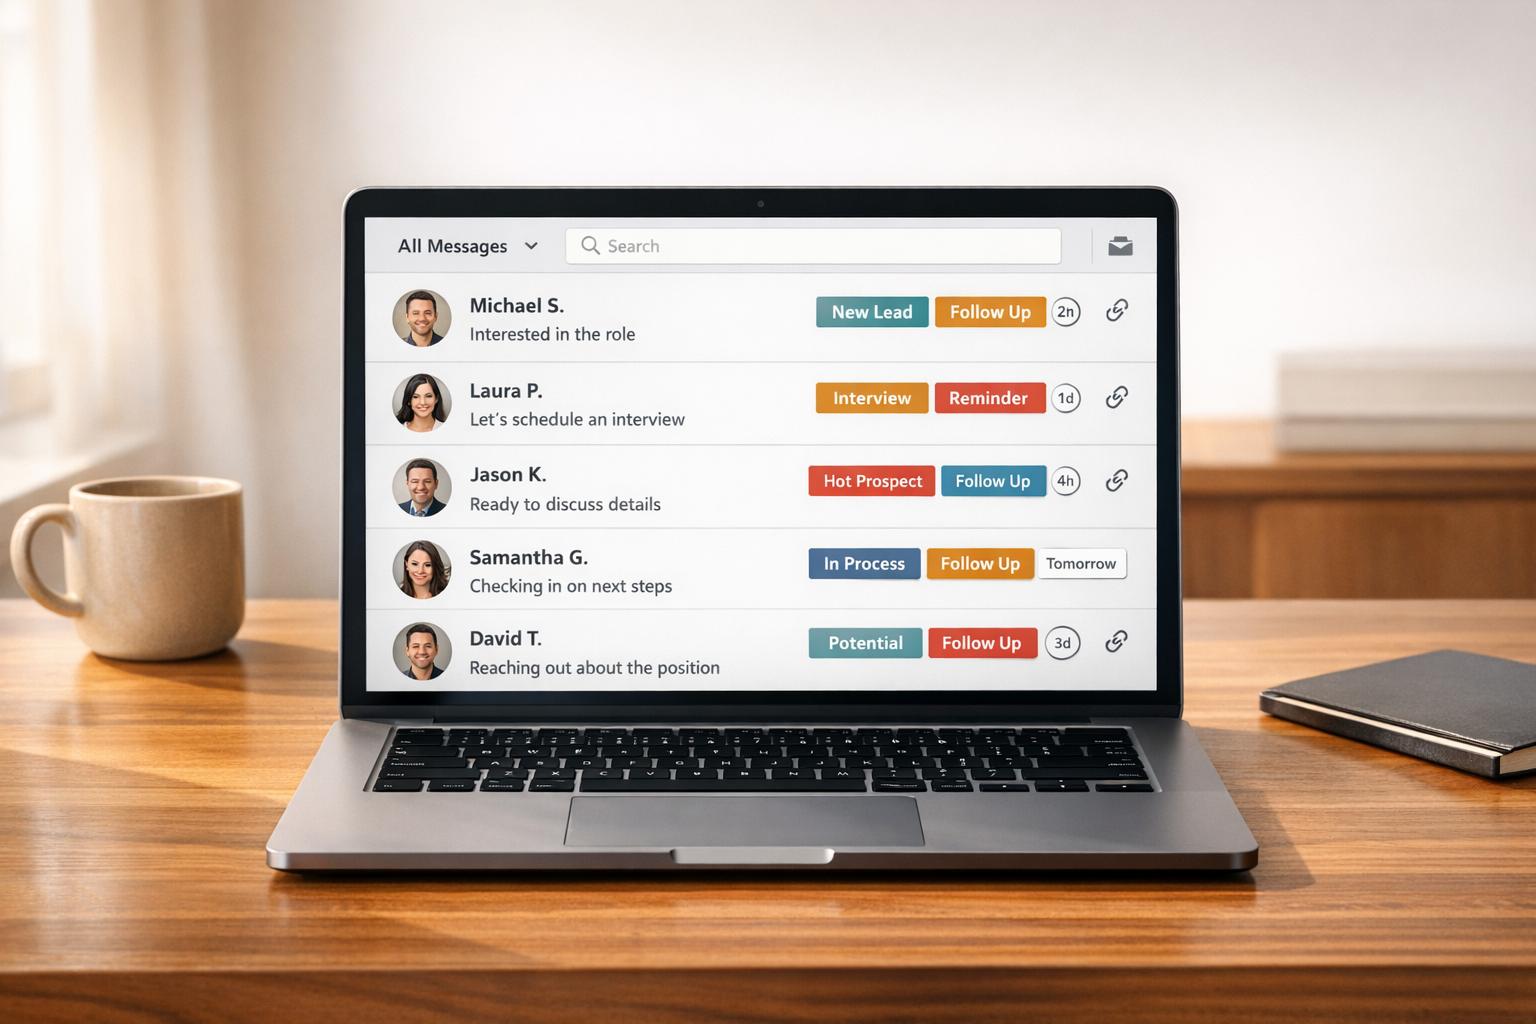
LinkedIn’s default inbox is designed for casual networking, but it falls short when it comes to the demands of high-volume recruiting. Every message gets dumped into a single, chronological feed, making it impossible to sort conversations by candidate stage, urgency, or role.
One of the biggest drawbacks? There’s no pipeline view. This means older messages, like a candidate’s reply from three days ago, can easily get buried under newer ones. There’s also no way to flag, label, or sort conversations based on where someone is in your process. On top of that, LinkedIn limits bulk InMail sends to just 25 at a time and doesn’t integrate other communication channels. If you’re also emailing candidates, you’re left managing multiple inboxes at once.
The solution? Implement a labeling system to organize conversations by recruiting stage.
Setting Up Labels and Split Inboxes
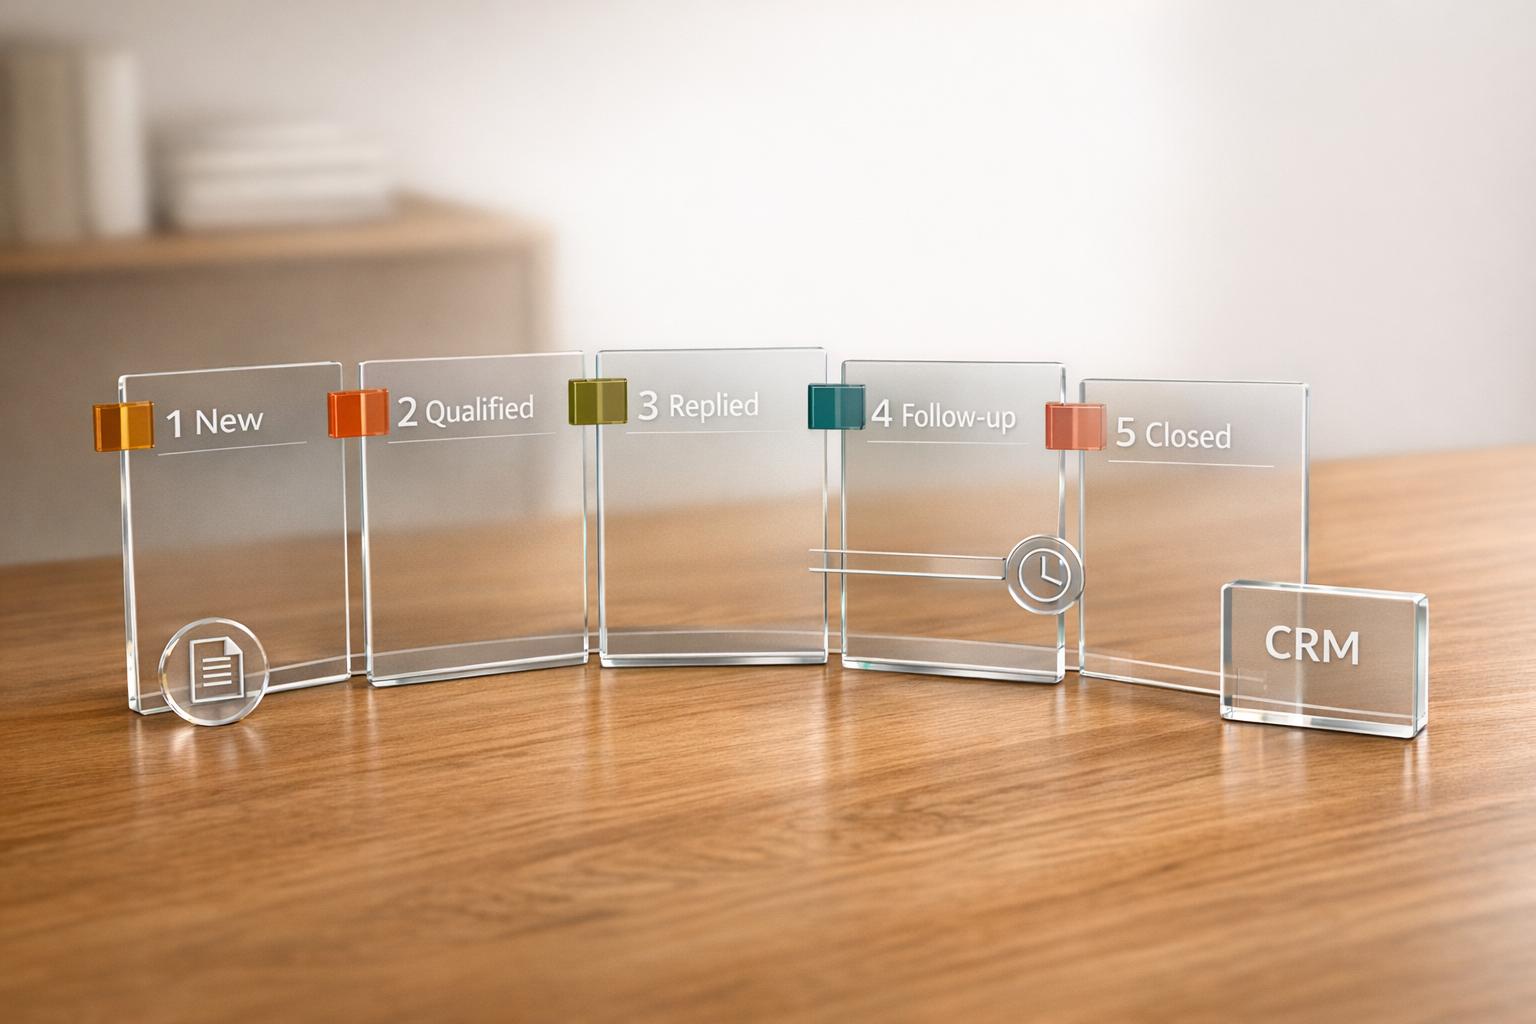
To bring order to the chaos, structure your inbox around recruiting funnel stages instead of relying on LinkedIn’s default chronological setup. Tools like Cesar.chat let you create labeled categories, turning your inbox into a set of focused, organized views. A simple yet effective setup might include:
- New Leads: Candidates you’ve connected with but haven’t yet messaged.
- Warm / Interested: Candidates who’ve responded positively or requested more information.
- Pipeline: Candidates actively moving toward an interview or offer.
- Rejections: Candidates who weren’t a fit but might be worth revisiting later.
This system eliminates the need to scroll endlessly, trying to recall the status of each conversation. Each label acts as a dedicated workspace, keeping your focus sharp.
Moving Conversations Through Your Workflow
A structured inbox doesn’t just keep things tidy – it ensures you’re moving candidates through your process intentionally. When a candidate responds positively and agrees to a call, update their label from New Leads to Warm / Interested, and then to Pipeline as they progress. This keeps your inbox aligned with reality at all times.
Here’s an important tip: sourcing tools aren’t perfect. Data from external platforms often comes with about a 30% error margin. To avoid wasting time and resources, add a triage step where you quickly verify leads before advancing them in your pipeline. For critical roles, consider a manual review before sending any automated messages. This small step can safeguard your response rates and keep your account in good standing.
Building a Triage and Follow-Up System That Scales
Once your inbox is neatly organized with labels, the next step is making sure no candidate gets overlooked. With a structured inbox, a solid triage system ensures every candidate gets timely follow-up. This approach turns what could be a chaotic flood of messages into a controlled and efficient workflow.
Applying an Inbox Zero Mindset to Recruiting
Building on the labeling system you’ve already set up, the Inbox Zero method assigns every conversation a clear next step. When a new message comes in, decide right away whether to reply, snooze, label, or archive it. This daily triage process keeps your inbox focused on active conversations, ensuring you only deal with what needs attention.
Using Snoozes and Reminders to Stay on Top of Follow-Ups
Snooze features add another layer to your label-based workflow by temporarily hiding conversations until they’re relevant again. For example, in Cesar.chat, you can snooze a thread to reappear on a specific date and time, so you don’t have to manually track pending conversations.
Timing matters. Since 90% of LinkedIn InMail responses come within a week of the initial message, setting your first follow-up reminder for day seven is a smart starting point. Aim to schedule outreach and reminders between Monday and Thursday, ideally between 9:00 a.m. and 10:00 a.m., as messages sent on Saturdays are 16% less likely to get a response compared to those sent during the workweek. This disciplined timing creates a reliable and effective follow-up routine.
Designing a Simple Follow-Up Sequence
With your labels and reminders in place, a straightforward follow-up sequence works well: send the initial outreach, follow up if there’s no response after seven days, and do a final check-in around day 14 to 21. If a candidate responds or declines, the sequence stops automatically, maintaining professionalism.
Recruiters who use automated follow-up sequences see a 39% boost in InMail acceptances compared to those who rely on manual follow-ups. The trick is combining automation with trigger-based stops to keep the process polished. For example, in Cesar.chat, automated triggers tied to labels and reminders handle transitions seamlessly. When a candidate moves from "New Leads" to "Warm / Interested", the system clears the follow-up reminder automatically, shifting the conversation to the next stage without extra effort on your part.
Using Snippets for Fast, Personalized Messaging
Handling a high volume of messages can feel overwhelming, but it doesn’t mean you have to sacrifice authenticity. Instead of typing out each message from scratch, recruiters can rely on snippets – pre-written templates that speed up communication while still leaving room for a personal touch.
What to Standardize and What to Personalize
Every message you send should strike a balance between standardization and personalization. The standardized part – the core – includes details like role descriptions, company background, and your call-to-action. These can be templated with snippets. The personalized part – the hook – is what makes your message resonate with the candidate and should be tailored for each individual.
Here’s a simple framework to guide your messaging: Relevance + Role Context + Why Them + Low-Friction Call-to-Action (CTA). Use snippets to handle the role context and CTA, but customize the "Why Them" section. For example, mention a recent promotion, a unique skill, or a standout project from their profile. This small effort can make a big difference – personalized InMails, for instance, see a 44% higher candidate acceptance rate compared to generic messages.
Building a Snippet Library in Cesar.chat
Cesar.chat simplifies this process with its snippet library feature, included in the Basic plan for $24/month. This tool lets you save and organize templates for your most frequent messages, so they’re ready to use at a moment’s notice. Here’s how you might structure your snippet library:
| Message Type | Standardized Elements | Personalized Elements |
|---|---|---|
| Initial Outreach | Role challenge, company mission, CTA | Specific project, current role, niche skill |
| Follow-Up | "Close-the-loop" language, team links | Team name, specific role context |
| Re-engagement | Previous interaction context, new role | New company name, recent promotion |
| Reply Handling | Scheduling links, FAQ answers | Specific answers to candidate questions |
To keep things organized, label your snippets clearly. For example: "Outreach – Engineering", "Follow-Up – Day 7", or "Reply – Interested." This way, you can quickly find and insert the right template during conversations. Even with a library of snippets, always ensure your messages feel personal.
Keeping Messages Personal at Scale
Snippets are great for efficiency, but don’t let them replace genuine engagement. Before hitting send, take a moment to tweak the opening line. Reference something specific from the candidate’s LinkedIn profile, like their current job, a skill endorsement, or even a recent post. These small personal touches go a long way in making your outreach feel thoughtful and sincere.
Connecting Your LinkedIn Inbox to Your Recruiting Tools
Bringing your LinkedIn messaging into sync with your recruiting tools ensures every conversation is tracked and managed seamlessly, from LinkedIn to your CRM. This kind of integration extends the efficiency of your labeling and follow-up systems beyond LinkedIn, creating a unified workflow. Without it, even the most organized processes can falter when LinkedIn conversations remain isolated from the rest of your recruiting setup.
Why Manual Data Entry Falls Short
Manually transferring candidate details into your CRM is not just time-consuming – it’s prone to errors. Missed updates can result in delayed follow-ups, an incomplete pipeline view, and even lost candidates.
On average, recruiting teams spend over 20 hours each week on manual tasks that could easily be automated. That’s nearly half a workweek spent on data entry instead of focusing on actual recruiting. As Automiq AI highlights:
"Your CRM is only as good as the data in it. Right now someone on your team is manually updating it – or not at all. AI keeps it accurate automatically."
When updates are skipped or delayed, inefficiencies grow, candidates drop off, and the reliability of your pipeline takes a hit. This is where automated CRM sync becomes a game-changer.
How Cesar.chat’s Live CRM Sync Simplifies Recruiting
Cesar.chat leverages LinkedIn’s internal APIs to sync messages in real time, ensuring every conversation – along with its labels and notes – flows directly into your CRM or connected tool.
As Cesar.chat explains:
"Cesar.chat gets your messages from LinkedIn’s internal APIs. Whatever messages you send and receive on LinkedIn are synced to Cesar and vice versa."
Currently, Cesar.chat offers live sync with HubSpot and Google Sheets, with integrations for Notion and Zoho CRM on the way. The Business plan ($32/month) includes up to three integrations, while the Enterprise plan ($40/month) provides unlimited sync destinations and white-glove setup support for more complex workflows. Labels like "Interview Scheduled" or "Technical Screen" can also be synced, ensuring your CRM reflects the full context of your conversations without additional effort.
Metrics to Measure Recruiting Efficiency
Once automated sync is in place, you can focus on tracking key metrics to refine your recruiting approach.
One critical metric is response time. Automation and AI-driven sync can cut response times dramatically – from 24 hours to under 5 minutes. This speed is essential when candidates are juggling multiple opportunities.
| Metric | Why It Matters |
|---|---|
| Weekly conversation volume | Tracks outreach consistency and capacity |
| Initial response time | Faster replies reduce candidate drop-offs |
| Follow-up adherence | Ensures every candidate stays engaged |
| CRM update accuracy | Keeps your pipeline up-to-date in real time |
| Admin hours saved per week | Highlights efficiency gains from automation |
If your team finds itself repeating the same administrative tasks more than five times a week, it’s a clear sign that automation could streamline your workflow.
Conclusion: Build a LinkedIn Inbox Workflow That Works at Scale
Handling a busy LinkedIn inbox doesn’t have to feel overwhelming. The tips in this guide – like setting clear goals, organizing your inbox with labels and split views, adopting an Inbox Zero approach, using snippets for quick personalization, and syncing conversations to your CRM – are designed to help you stay on top of your messages as they grow in volume.
With tools like Cesar.chat, you can take these strategies even further. Its features can help recruiters process LinkedIn DMs up to twice as fast compared to using the platform’s native inbox.
FAQs
How do I know if my LinkedIn inbox is “high-volume”?
If your LinkedIn inbox feels overwhelming due to handling a flood of candidate or contact conversations, it’s likely because the platform’s built-in tools aren’t enough to keep things under control. Managing dozens – or even hundreds – of messages daily can quickly become a logistical nightmare, especially if you’re coordinating with a team. In these cases, tools like shared inboxes or automation can be game-changers, helping you stay organized and respond promptly. Without the right strategies, it’s all too easy to let important opportunities slip through the cracks.
What’s the safest follow-up cadence to avoid being flagged?
To stay under LinkedIn’s radar, it’s important to pace yourself and avoid sudden spikes in activity. Spread your outreach efforts evenly throughout the workday, and prioritize sending personalized messages instead of relying on mass messaging. Stick to safe activity limits: aim for 15–25 connection requests and 40–80 messages daily, while ensuring your connection acceptance rate stays above 30%. This method not only helps you stay compliant but also minimizes the chances of running into LinkedIn’s automated restrictions.
Which inbox labels should I use for a recruiting pipeline?
Using inbox labels can streamline your recruitment process by organizing conversations based on hiring stages. For example, you can create labels like "Application Received", "Phone Screen", "Interview Scheduled", and "Offer Extended". This setup makes it easier to prioritize tasks and track candidates as they move through each stage, ensuring nothing falls through the cracks.